
- Overview
- Setup
- Main Panel
- Settings
- New Words
- Basket
- Resources
- Old Words
- Zoom vs Web
- Troubleshooting
- Data & Privacy
Overview
ElSol Teacher Panel is a lesson assistant that works both as a Zoom App (embedded inside the Zoom client during a meeting) and as a regular web app in a browser. Both versions share the same features; a few functions — like sending text directly to Zoom chat — are only available inside Zoom.
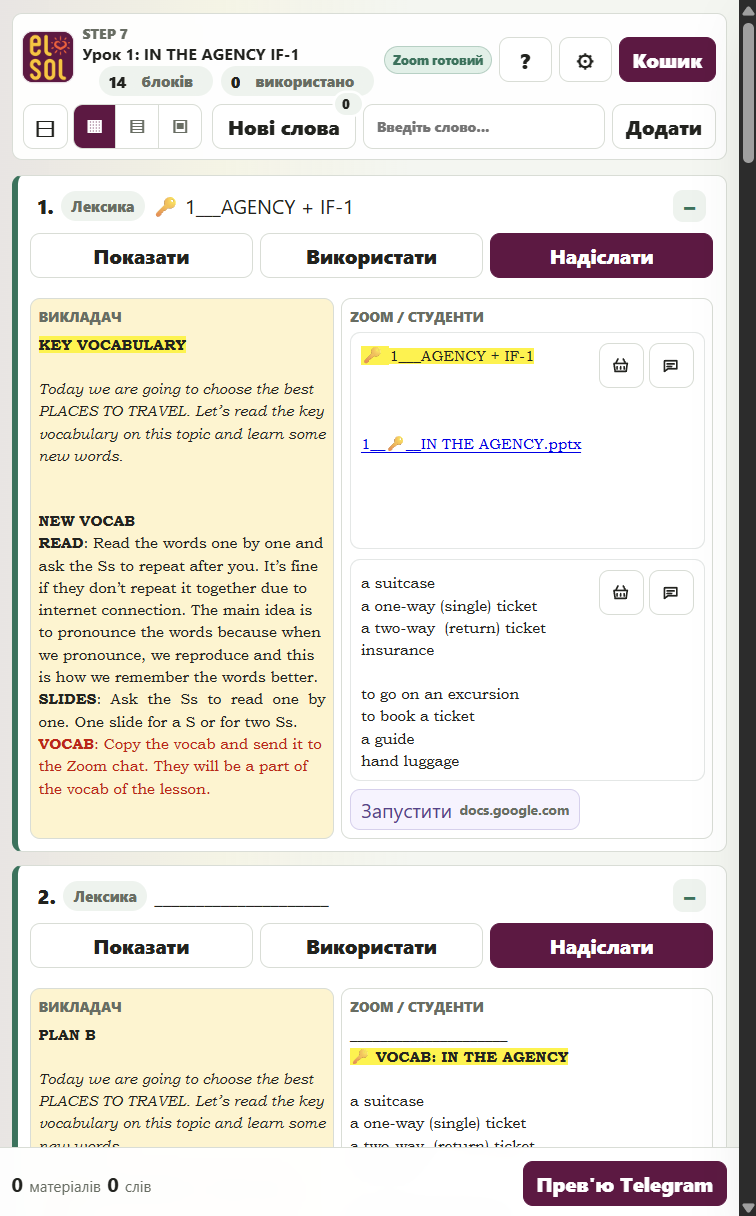
The panel is organized into several areas:
- Top bar — word input, layout switcher, action buttons, and settings.
- Lesson list — collapsible rows with teacher guidance and student-facing material.
- New Words panel — a slide-in panel for collecting vocabulary during the lesson.
- Basket drawer — a review of everything used and a Telegram-ready summary.
Setup
As a Zoom App
- Open the ElSol Teacher Panel installation link provided by ElSol.
- Sign in to Zoom if prompted and click Allow to authorize the app.
- Start or join a Zoom Meeting.
- Open Apps in the Zoom toolbar and choose ElSol Teacher Panel.
As a Web App
Open the panel URL in any modern desktop browser. No installation required. Lesson state is saved per browser.
First Launch & Guided Tour
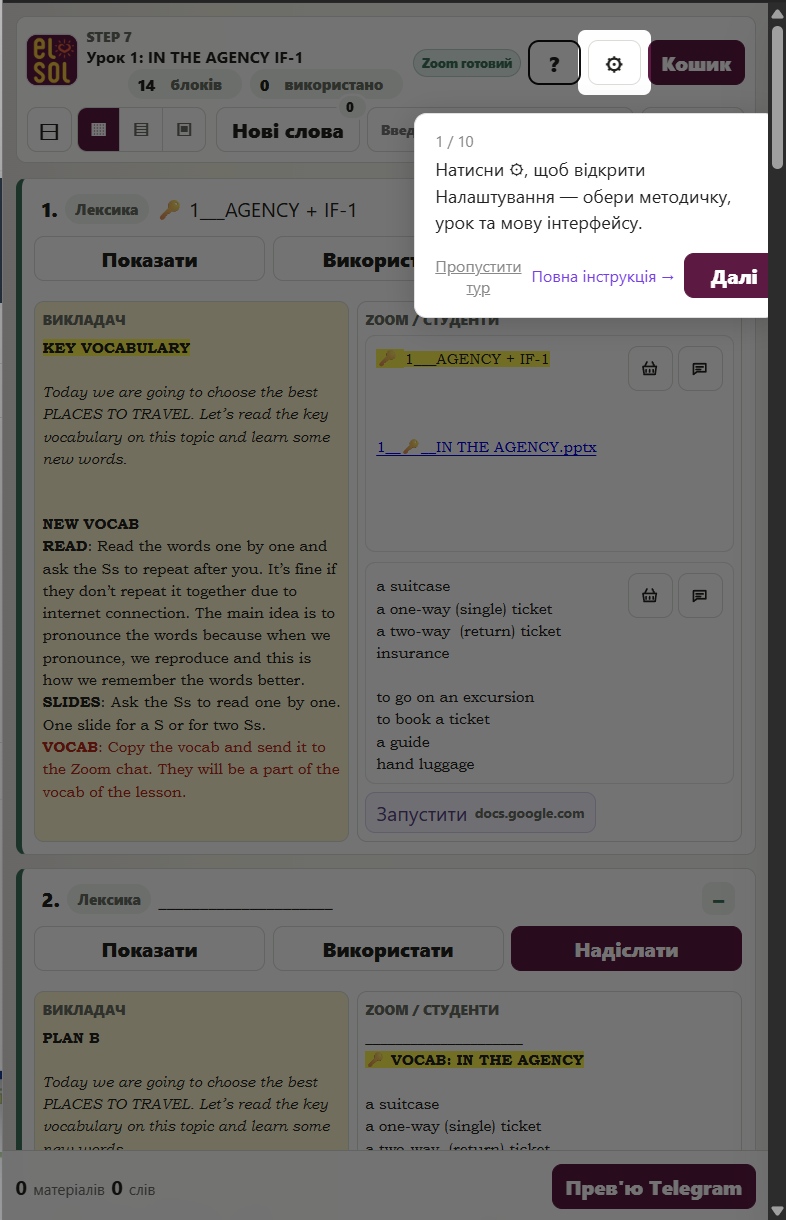
When the app opens for the first time, a guided tour starts automatically — it highlights each control one step at a time with a spotlight and a short description. You can skip the tour at any point. To replay it later, click the ? button in the top bar.
Each panel also has its own ? button that starts a focused tour for that section: Settings, New Words, Basket, and Student Display each have their own tour context.
Main Panel
Choosing a Lesson
Open Settings (⚙) and choose the methodology language, methodology, and lesson. The lesson list updates immediately. You can switch lessons at any time; state for each lesson is saved separately.
Layout Modes
Use the four layout icons in the top bar to choose how the lesson rows are displayed:
- Two-column — teacher guidance on the left, student material on the right. Best on wide screens.
- Stacked — teacher and student sections stacked vertically. Good for medium widths.
- Compact — single column, icon-only buttons. Best for the narrow Zoom side panel.
- Student focus — only student-facing material is shown. Good for quick scanning.

Working with Lesson Rows
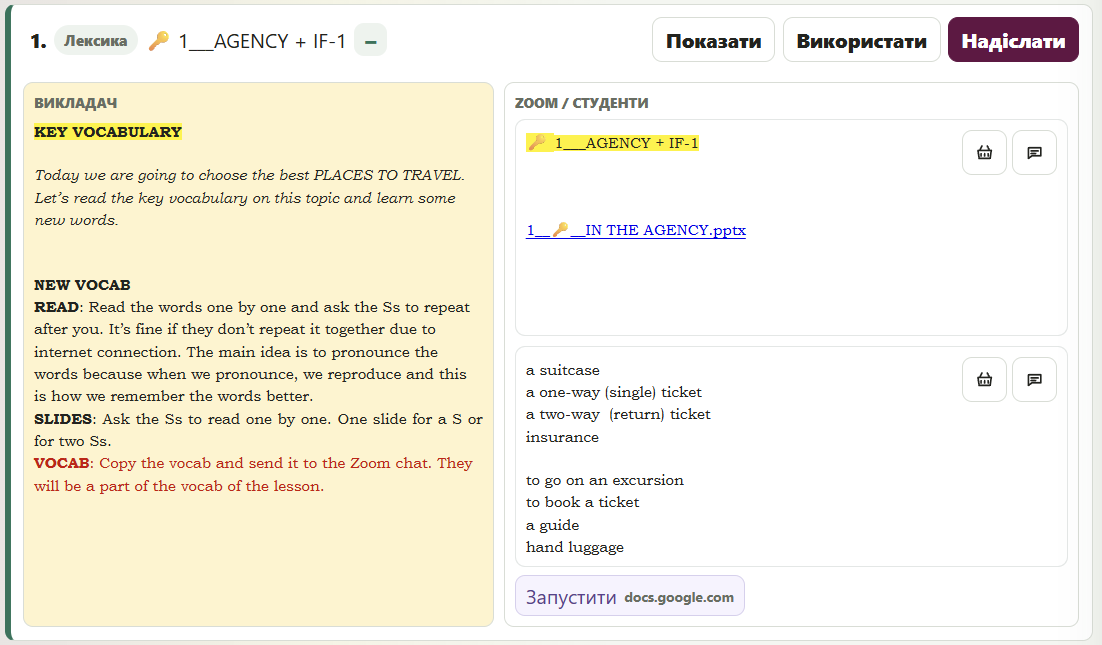
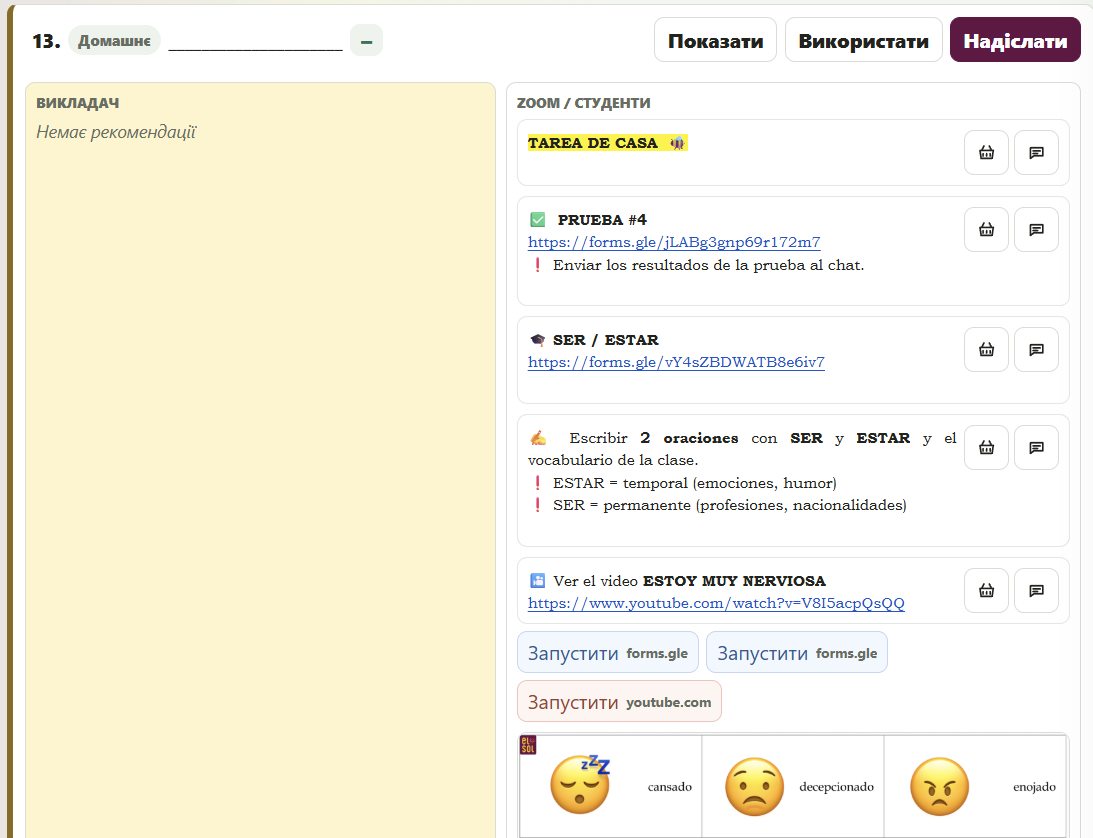
Click a row header to expand or collapse it. Inside an expanded row you will find:
- Teacher text — instructions, prompts, and notes for the teacher only.
- Student text — the material that goes to the student via Zoom chat.
- Copy — copies the student text to the clipboard so you can paste it into Zoom chat manually.
- Send to Zoom Zoom only — sends the student text directly to the Zoom meeting chat.
- Use — marks the row as used and adds it to the basket without sending anything.
- Resource chips — links to presentations, videos, forms, and files (see Resources).
Lesson State Is Saved Automatically
The app saves the selected lesson, which rows are expanded, which rows were used, new words, old-word edits, and basket contents — all in the browser's local storage. Everything is restored automatically the next time you open the app, even after closing Zoom or the browser.
To start fresh, open Settings → Reset (Скинути). A confirmation dialog will appear before anything is cleared.
Settings Panel
Click ⚙ in the top bar to open Settings. The panel has three tabs:
Lesson & Interface
- Methodology language — German, English, or Spanish.
- Methodology — the specific course or level.
- Lesson — the lesson within the methodology.
- Interface language — EN, DE, UK, ES.
- Interface scale — 70–130%. Useful for the narrow Zoom side panel (try 75–80%).
- Words per group — controls how many words appear per row in the Old Words display.
- Reset (Скинути) — clears the current lesson state after confirmation.

AI Assistant
Configure word-assistant rules per target language. The defaults cover standard grammar hints, translations, and emoji suggestions. You can edit the rules directly in the text area — changes are saved automatically.
Technical
- Copy format — Rich (formatted HTML) or Plain text. Use Plain if Zoom chat strips formatting.
- OpenAI API key — enter your own key to use the AI word assistant.
- Debug options — for troubleshooting only.
New Words Panel
The New Words panel collects vocabulary introduced during the lesson. To add a word:
- Type the word in the word input field in the top bar.
- Press Enter or click Add. The word is added to the panel and copied to the clipboard instantly, ready to paste into Zoom chat.
The AI assistant formats the word in the background (spelling, grammar hints, translation, emoji) without blocking the copy flow. You can send the plain word immediately and the formatted version will appear in the panel once it is ready.
To open the full word dialog with detailed hints, click the word in the New Words panel. From there you can edit the word, regenerate hints, and copy the formatted version.

At the end of the lesson, all new words are included in the basket's Telegram summary.
Lesson Basket
The basket collects everything used during the lesson — rows marked with Use or Send to Zoom, plus all new words. Open the basket by clicking Кошик / Basket in the top bar.
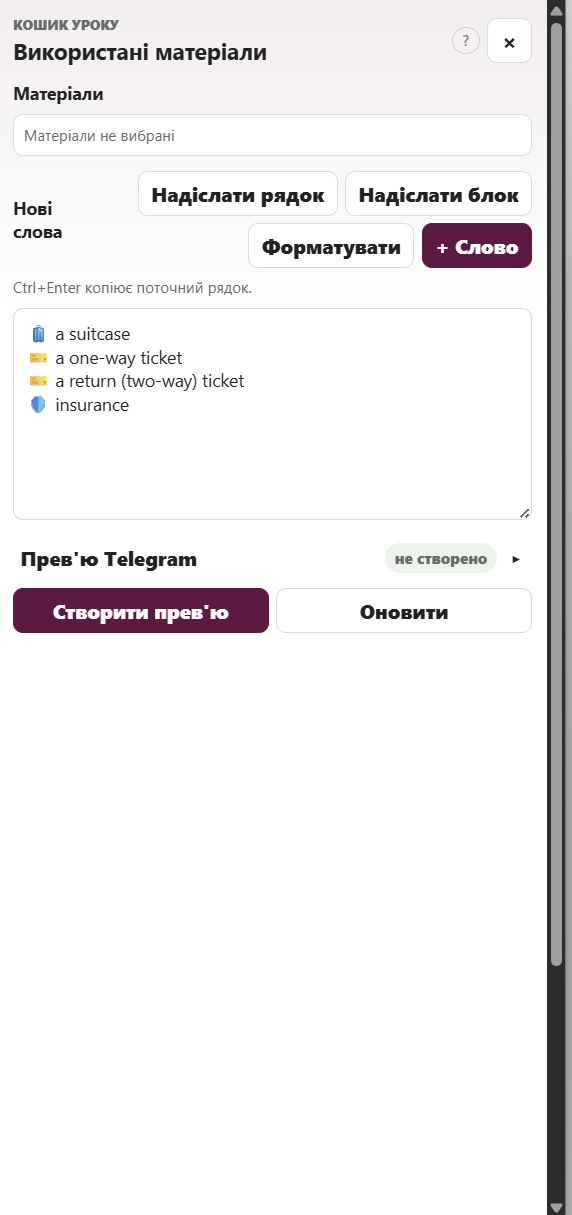
Inside the basket you can:
- Review used lesson blocks and remove any that should not be in the summary.
- See collected new words with their formatted hints.
- Preview three Telegram messages — materials summary, new words, and homework — and copy each with one click.
Resources: Presentations, Video, Forms, Drive
Lesson rows can include resource chips. Clicking a chip opens the resource inside the panel as an embedded preview when possible:
- Google Slides — embedded when the presentation is published to the web. Otherwise opens in a new tab.
- YouTube — embedded video player inside the panel.
- Google Forms — embedded form.
- Google Drive — file preview inside the panel.
- Audio — playback inside the panel.
- Links — open in a new tab.
Old Words Block
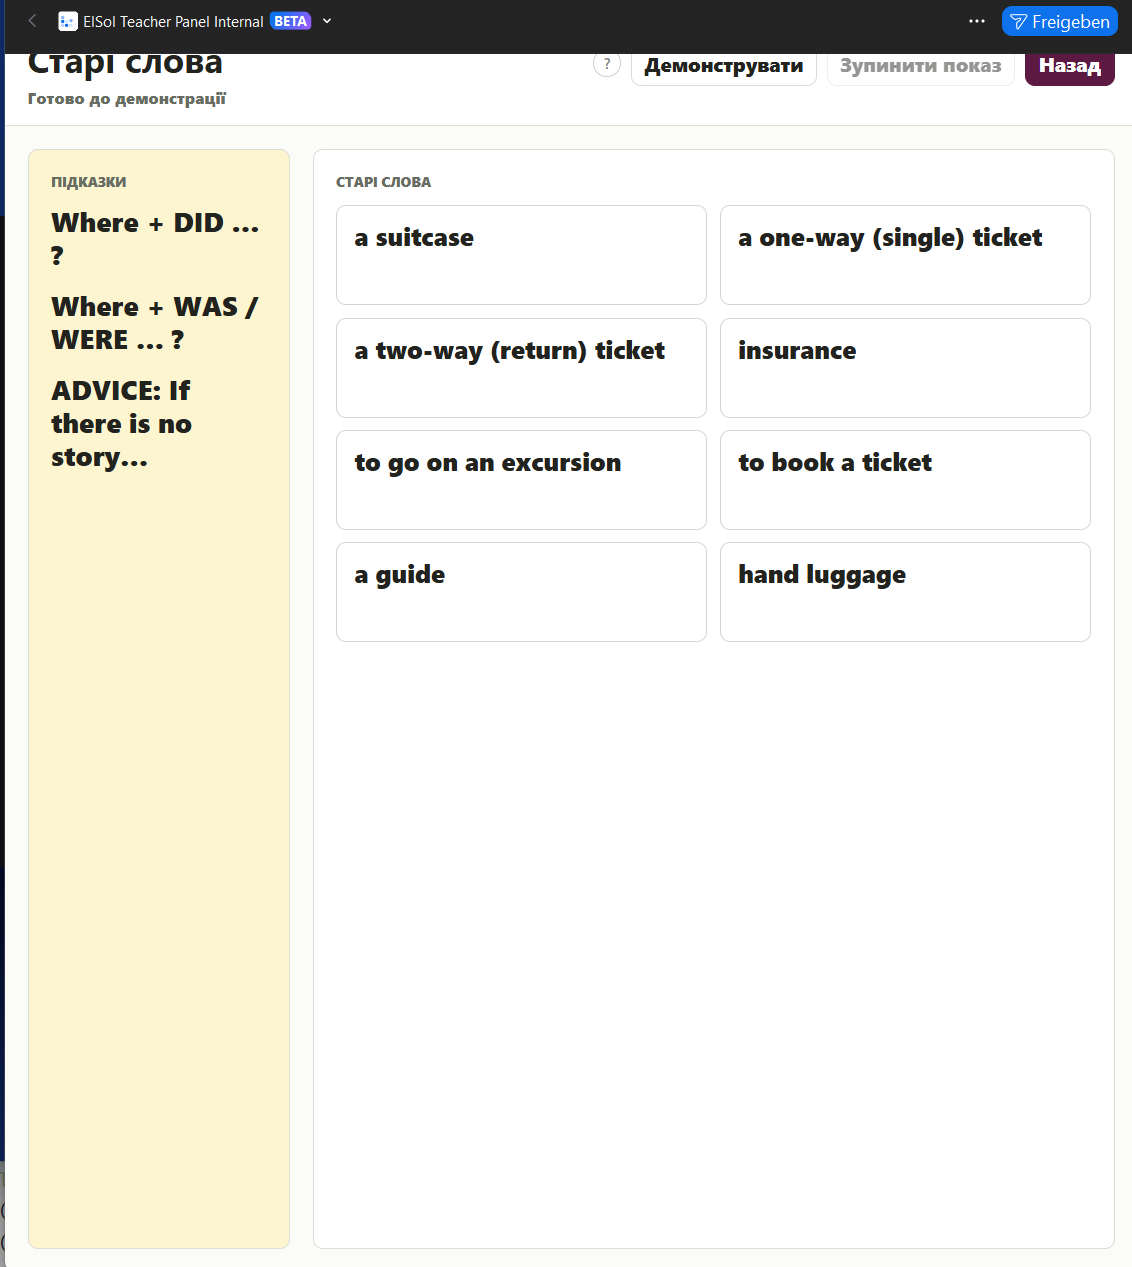
The first row of each lesson contains the Old Words block (Alte Wörter / Старі слова). It shows vocabulary from previous lessons that the student should review at the start of class.
- The teacher can edit prompt lines and the word list directly in the panel.
- Click Show to open a student-facing display for screen sharing.
- Click a word tile to add a ☀️ mark — indicating the word was actively used during review. Click the ☀️ again to remove it.
- All edits and marks are saved automatically and survive a reload.
Zoom vs Web — Differences
The app runs in both environments. The main differences are:
| Feature | Zoom App | Web Browser |
|---|---|---|
| Send text to Zoom chat | ✅ Direct — one click sends to the active meeting chat | ❌ Copy to clipboard, then paste manually |
| Interface scale | Usually needs 75–85% in the side panel; 100% in a popped-out window | 100% works well on most screens |
| Window width | Zoom side panel is narrow (~360–420px). Compact layout recommended. | Full browser width. Two-column layout works well. |
| Embedded resources | Available when the Zoom App Domain Allow List includes the resource domain | All embedded resources work normally |
| Confirmation dialogs | Custom in-app dialogs (browser confirm() is blocked inside Zoom) |
Same custom dialogs |
| Lesson state | Saved in the embedded Zoom browser's local storage | Saved in your browser's local storage |
Troubleshooting
The app is not visible in Zoom Apps
Confirm the app was authorized with the same Zoom account used in the Zoom client. Restart the Zoom client if the app does not appear immediately after installation.
Send to Zoom does not work
The app must be open inside an active Zoom Meeting. If the meeting has not started yet, or the app is opened in a browser instead of Zoom, the Send button will not be available. Use Copy and paste manually as a fallback.
Text is too large or too small
Open Settings → Lesson & Interface and adjust the Interface scale slider (70–130%). For the Zoom side panel, 75–80% is usually comfortable. You can also switch to the Compact layout from the top bar.
Lesson state was lost after reload
State is stored in the browser's local storage. If you cleared browser data, used a private/incognito window, or opened the app in a different browser, the state will not be present. State saved inside Zoom is separate from state saved in a desktop browser — they do not sync.
Guided tour does not start on first launch
If the tour was already seen in a previous session (the "tour seen" flag is stored in local storage), it will not start automatically. Click the ? button in the top bar to start it manually at any time.
The AI word assistant does not respond
Check that an OpenAI API key is entered in Settings → Technical. If the key is correct and the assistant still does not respond, the OpenAI service may be temporarily unavailable. Use the plain copy flow during the lesson and try again later.
An embedded resource (video, form, presentation) does not load
Inside Zoom, resources must be on a domain that is in the Zoom App Domain Allow List. Google Slides, YouTube, Google Forms, and Google Drive are included. If a resource from a different domain does not embed, click its chip to open it in a new browser tab instead.
Remove the App
- Open Zoom Marketplace or Zoom Apps management with the same Zoom account that authorized the app.
- Find ElSol Teacher Panel in the installed apps list.
- Choose Remove or Uninstall and confirm.
Data & Privacy
ElSol Teacher Panel does not store Zoom OAuth tokens, Zoom user data, meeting recordings, participant media, or Zoom chat history on its server.
Lesson settings, selected materials, new words, and basket content are stored locally in the user's browser (local storage). To remove this data, clear the browser storage for this site, or use Settings → Reset inside the app.